Difference between revisions of "HPC:Jupyter"
| Line 60: | Line 60: | ||
Save your tunnel. Finally, start your tunnel by hitting the "Play" button, or simply by clicking "Start all tunnels" | Save your tunnel. Finally, start your tunnel by hitting the "Play" button, or simply by clicking "Start all tunnels" | ||
<br /> | <br /> | ||
| − | [[image: | + | [[image:Tunnel3.png|center|600px]] |
Revision as of 21:08, 10 October 2019
Jupyter Notebook
Currently, the HPC is capable of hosting a Jupyter Notebook workspace in an interactive session. Currently, this limits the Jupyter Notebook to an 8 hour session. Please follow these steps to set up your Jupyter Notebook workspace.
The initial setup for Jupyter is a little tricky, but once completed is easy to get up and running again.
This guide will assume that you are using MobaXTerm as your terminal emulator in order to set up SSH tunneling. However, this can also be done via other tools (Powershell, PuTTy, et cetera) but those tools will not be covered in this guide. If you have questions about setting up Jupyter with other tools, please contact the HPC team (or come to office hours!)
First, install the Jupyter client.
[obki@consign ~]$ bsub -Is bash
<< Waiting for dispatch...>>
<<Starting on node059.hpc.local>>
[obki@node059 ~]$ module load python/3.6.3
[obki@node059 ~]$ pip3 install jupyter --user
At this point Jupyter should be installed via pip3. To make sure that it installed properly, run the following command.
[obki@node059 ~]$ ls $HOME/.local/bin/jupyter
/home/obki/.local/bin/jupyter
This regular file should be the output of the ls command. Next, we can start the the Jupyter host from an interactive session
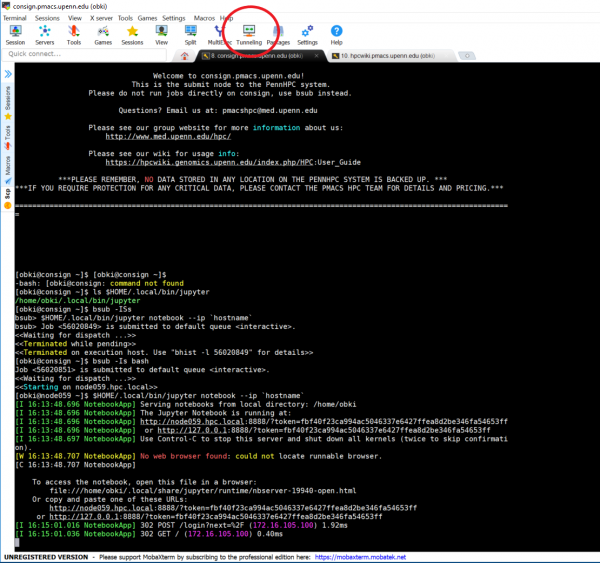
[obki@node059 ~]$ $HOME/.local/bin/jupyter notebook --ip `hostname`
[I 16:13:48.696 NotebookApp] Serving notebooks from local directory: /home/obki
[I 16:13:48.696 NotebookApp] The Jupyter Notebook is running at:
[I 16:13:48.696 NotebookApp] http://node059.hpc.local:8888/?token=fbf40f23ca994ac5046337e6427ffea8d2be346fa54653ff
[I 16:13:48.696 NotebookApp]  or http://127.0.0.1:8888/?token=fbf40f23ca994ac5046337e6427ffea8d2be346fa54653ff
[I 16:13:48.697 NotebookApp] Use Control-C to stop this server and shut down all kernels (twice to skip confirmation).
[W 16:13:48.707 NotebookApp] No web browser found: could not locate runnable browser.
[C 16:13:48.707 NotebookApp]

    To access the notebook, open this file in a browser:
        file:///home/obki/.local/share/jupyter/runtime/nbserver-19940-open.html
    Or copy and paste one of these URLs:
        http://node059.hpc.local:8888/?token=fbf40f23ca994ac5046337e6427ffea8d2be346fa54653ff
     or http://127.0.0.1:8888/?token=fbf40f23ca994ac5046337e6427ffea8d2be346fa54653ff
However, you still cannot bring up the Jupyter Notebook webpage without a few more steps. Firstly, you need to connect to the PMACS VPN. Refer to the login guide on how to install Forticlient VPN and connect to the PMACS VPN
Once you have connected to the VPN, you will need to set up an SSH tunnel. MobaXTerm makes this process relatively simple with a nice GUI.
First, open the "Tunnel" feature on MobaXterm
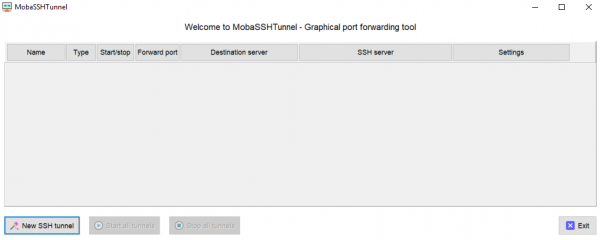
Create a new tunnel
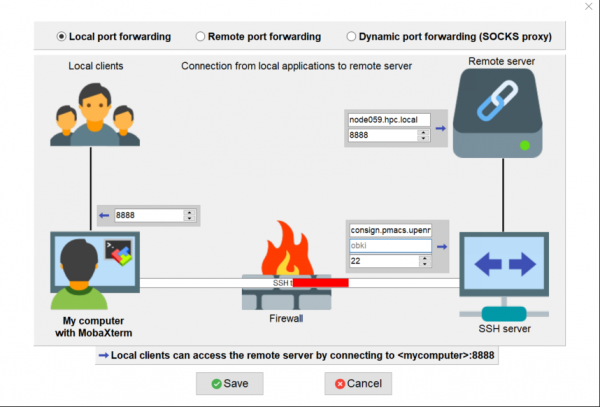
We'll be using local port forwarding.
Note: The <remote server> field is dependant on what node your interactive session (and Jupyter) is running. For me this is Node059 but may be different for you. Please adjust your input according to the node that you are running Jupyter on
These are the inputs you should use for each input field.
Save your tunnel. Finally, start your tunnel by hitting the "Play" button, or simply by clicking "Start all tunnels"


