Difference between revisions of "GCB 537:Main Page"
| (4 intermediate revisions by the same user not shown) | |||
| Line 38: | Line 38: | ||
==== VPN (for off-campus access) ==== | ==== VPN (for off-campus access) ==== | ||
| − | + | Students enrolled in the GCB537 course will need to use our VPN to establish secure connections to the class cluster when trying to SSH from off-campus. Once the VPN tunnel has been setup, normal SSH connections to the GCB537 class cluster head node: gcb537.pmacs.upenn.edu can be established. | |
| − | + | There are separate stand-alone VPN applications for different Operating systems. | |
| − | + | Download the appropriate installer for | |
| − | |||
| − | |||
| − | |||
| − | |||
| − | |||
| − | Download | ||
| − | |||
| − | |||
| − | |||
| − | |||
| − | |||
| − | |||
| − | |||
| − | |||
| − | |||
| − | |||
[https://upenn.box.com/s/o7yl6jh35o6j3xuu8q6bj6mixt4x4xwh Mac OSX] | [https://upenn.box.com/s/o7yl6jh35o6j3xuu8q6bj6mixt4x4xwh Mac OSX] | ||
| Line 71: | Line 55: | ||
See pictures [[HPC:Login#More_VPN_INFO| below]] for details on how to configure the Standalone VPN client (works for Windows and MacOS). Separate information for GNU/Linux VPN clients is also [[HPC:Login#More_VPN_INFO| below]]. | See pictures [[HPC:Login#More_VPN_INFO| below]] for details on how to configure the Standalone VPN client (works for Windows and MacOS). Separate information for GNU/Linux VPN clients is also [[HPC:Login#More_VPN_INFO| below]]. | ||
| − | |||
==== VPN Client for GNU/Linux ==== | ==== VPN Client for GNU/Linux ==== | ||
| − | + | The FortiClient application for GNU/Linux systems needs to downloaded directly from the FortiNet website. | |
== Connecting to the class cluster environment == | == Connecting to the class cluster environment == | ||
| − | Secure shell (ssh) is the only supported method of connecting to the class cluster environment. The login machine name is gcb537.pmacs.upenn.edu. Below are instructions on how to create Public-Private keys on GNU/Linux, Mac OSX and Windows systems. | + | Secure shell (ssh) is the only supported method of connecting to the class cluster environment. '''The login machine name is gcb537.pmacs.upenn.edu.''' Below are instructions on how to create Public-Private keys on GNU/Linux, Mac OSX and Windows systems. |
'''Note:''' While there are several SSH clients available for all platforms. We only show instructions for and are able to support the usage of the following tools. | '''Note:''' While there are several SSH clients available for all platforms. We only show instructions for and are able to support the usage of the following tools. | ||
| Line 188: | Line 171: | ||
[[image:WinSCP6.png|center]] <br> | [[image:WinSCP6.png|center]] <br> | ||
[[image:WinSCP7.png|center]] <br> | [[image:WinSCP7.png|center]] <br> | ||
| + | |||
| + | == '''More VPN INFO''' == | ||
| + | Below are screenshots that describe how to use the PMACS VPN on Windows or MacOS systems: | ||
| + | |||
| + | [[image:PMACS_VPN_OSX_setup.png|center|500px]] | ||
| + | |||
| + | Below are screenshots that describe how to use the PMACS VPN on GNU/Linux systems: | ||
| + | |||
| + | |||
| + | [[image:Forticlient1-1.png|center|500px]] | ||
| + | |||
| + | |||
| + | |||
| + | [[image:Forticlient2.png|center|500px]] | ||
| + | |||
| + | |||
| + | |||
| + | [[image:Forticlient3.png|center|500px]] | ||
| + | |||
| + | |||
| + | |||
| + | [[image:Forticlient4-1.png|center|500px]] | ||
Latest revision as of 15:58, 31 January 2019
This page is intended to provide students enrolled in GCB537 with information about how to access the dedicated compute cluster for this course. The course website is located here. For detailed information about the PMACS HPC go to our main page
Contents
- 1 Other Pages
- 2 Important information
- 3 Connecting to the class cluster environment
- 3.1 Setup information for GNU/Linux and Mac OSX Users
- 3.2 Setup information for Windows Users
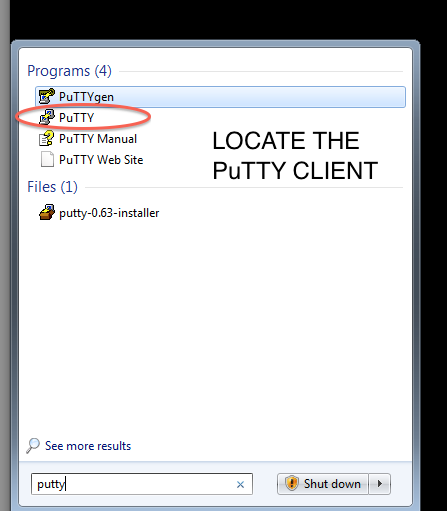
- 3.2.1 Step 1: Download and install the PuTTY full installer (if you don't already have it installed)
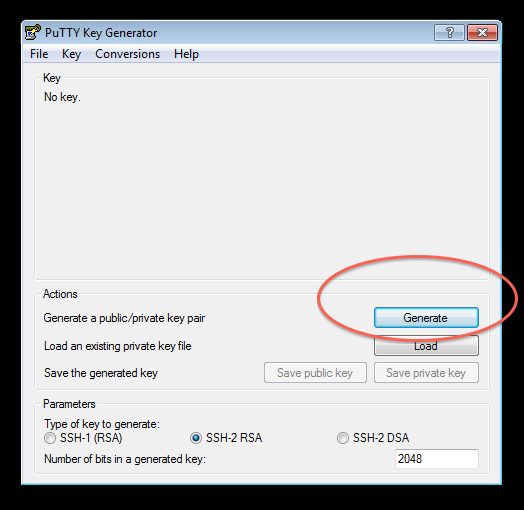
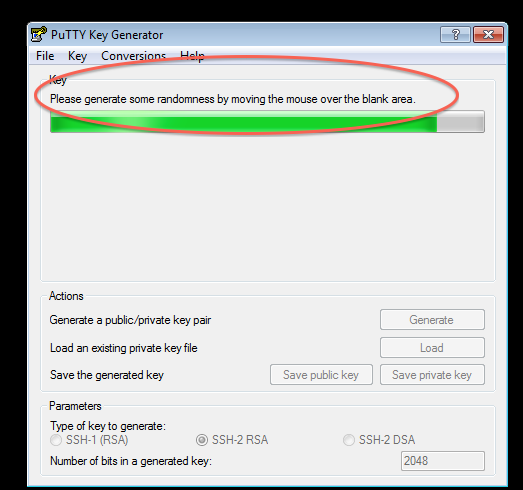
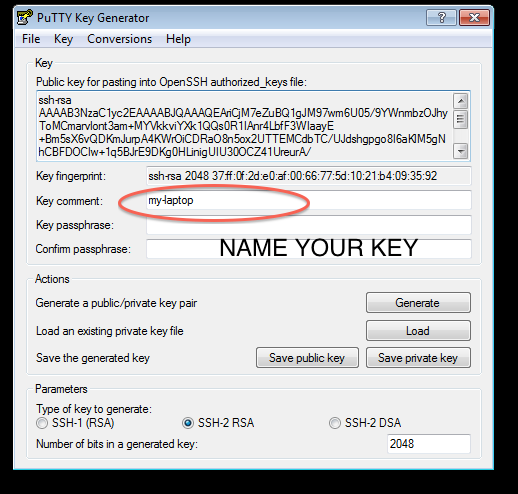
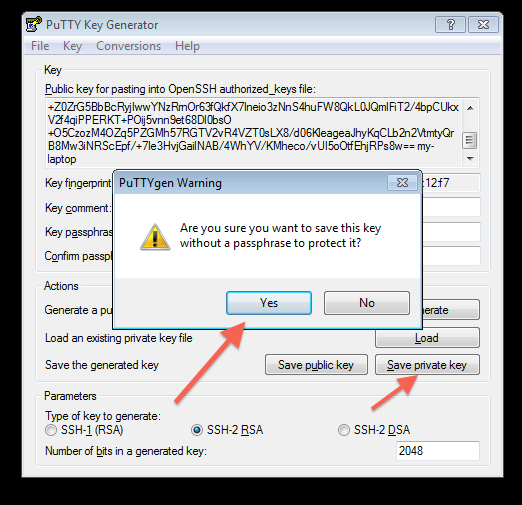
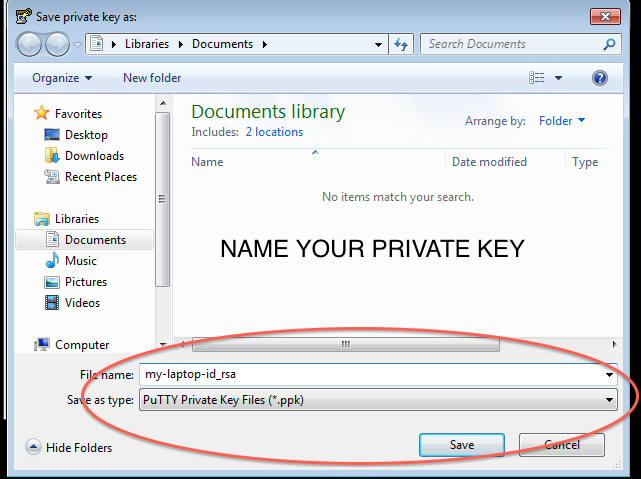
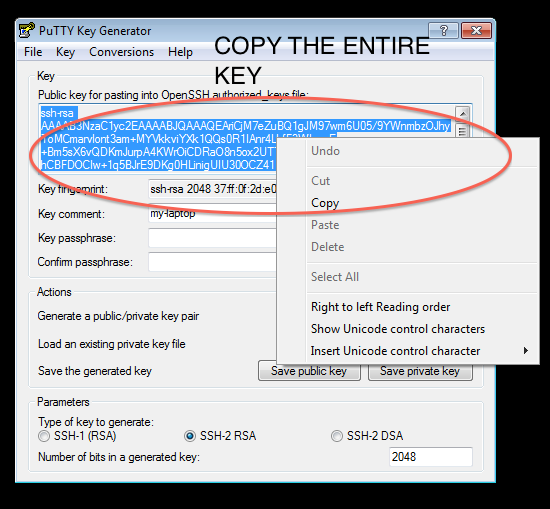
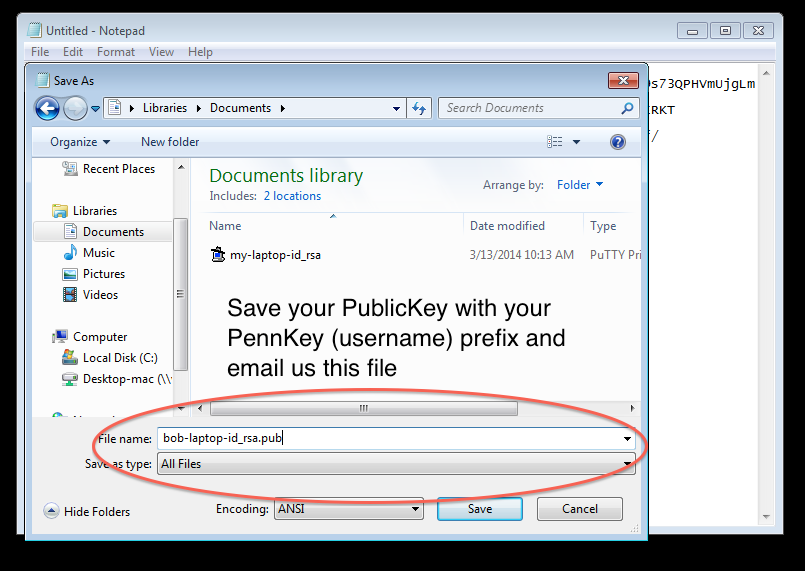
- 3.2.2 Step 2: Generate Keypair and save a copy of both the Public and Private keys
- 3.2.3 Step 3: Configure PuTTY to use the keys that were generated above
- 3.2.4 Step 4: Install and configure WinSCP to use the PuTTY profile created above
- 4 More VPN INFO
Other Pages
Important information
Setup
In the sections that follow, information is provided on how student laptops/desktops can be configured to access the compute environment dedicated for the course: GCB537. You may find references to a server called demohpc.pmacs.upenn.edu, please remember to replace this with gcb537.pmacs.upenn.edu
If you are looking for the course website, it is located here.
The Environment
- The compute cluster environment for GCB537 course closely resembles the PMACS HPC environment. Some of the basic job submission commands taught in this course may be used on the PMACS cluster.
However, some changes to the commands/scripts may be necessary before attempting to run these on the PMACS cluster.
- The course environment is behind a firewall and students who wish to access this environment from off-campus/non-Penn networks must use the VPN. See below for VPN instructions.
- SSH is the only protocol allowed through the firewall to the course's compute environment. File transfer to/from this environment is allowed only through SCP/SFTP. Students are expected to use client programs that support SSH (for terminal/command line access) and SCP/SFTP (for file transfer operations). SSH/SCP/SFTP connections to this environment is allowed only by means of PublicKey authentication and not password based authentication. Instructions to setup Public-Private keypairs is provided in the sections below.
Backup
Data/code stored in any of the accounts on the class cluster is NOT BACKED UP. It is the student's responsibility to make sure data/code for this course is either version controlled (using Git, for example) or stored elsewhere.
Temporary Password
While the class cluster environment itself is configured for Public Key based authentication only, passwords are necessary to login into the PMACS VPN, should students wish to access this environment from off-campus/non-PennNet networks. A temporary password will be provided to all students who don't already have PMACS accounts. Students must change this temporary password and enroll into the PMACS password reset system prior to the start of the class. All PMACS passwords expire every 180 days, therefore this password change should be necessary only once this semester (provided you don't forget your password!).
Students who already have valid PMACS accounts will not be provided a temporary password and can continue to use their existing PMACS account passwords to login into the VPN.
List of Important Servers
- gcb537.pmacs.upenn.edu : login/job submission server ; Do NOT run jobs on this server; Always use one of the compute nodes
VPN (for off-campus access)
Students enrolled in the GCB537 course will need to use our VPN to establish secure connections to the class cluster when trying to SSH from off-campus. Once the VPN tunnel has been setup, normal SSH connections to the GCB537 class cluster head node: gcb537.pmacs.upenn.edu can be established.
There are separate stand-alone VPN applications for different Operating systems.
Download the appropriate installer for
OR
Once the appropriate installer has been downloaded and installed, a reboot may be required to reboot. Subsequently, the stand-alone client console must be used, without needing to use a web browser (as described on our wiki).
See pictures below for details on how to configure the Standalone VPN client (works for Windows and MacOS). Separate information for GNU/Linux VPN clients is also below.
VPN Client for GNU/Linux
The FortiClient application for GNU/Linux systems needs to downloaded directly from the FortiNet website.
Connecting to the class cluster environment
Secure shell (ssh) is the only supported method of connecting to the class cluster environment. The login machine name is gcb537.pmacs.upenn.edu. Below are instructions on how to create Public-Private keys on GNU/Linux, Mac OSX and Windows systems.
Note: While there are several SSH clients available for all platforms. We only show instructions for and are able to support the usage of the following tools.
GNU/Linux or Mac OSX:
- ssh via built-in terminal emulator program
- File transfer via either command line (scp) or FileZilla
Windows:
- ssh via PuTTY
- File transfer (SCP/SFTP) via WinSCP
If you have a preference for a different ssh client or file transfer program, please ensure that you know how to configure it to use Public Key Authenticaion before the start of the semester.
Setup information for GNU/Linux and Mac OSX Users
Summary of tasks:
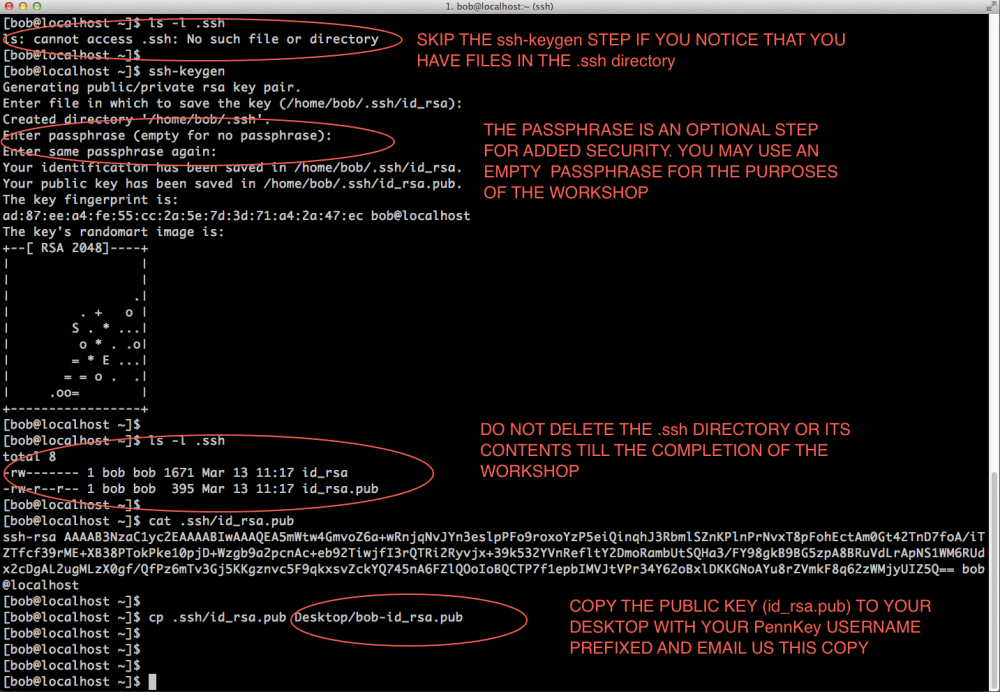
- Verify that you haven't already generated a Public-Priviate keypair (look inside the .ssh directory in your home area)
- If don't have keys, open a terminal and run the ssh-keygen command and follow the on-screen instructions refer picture below.
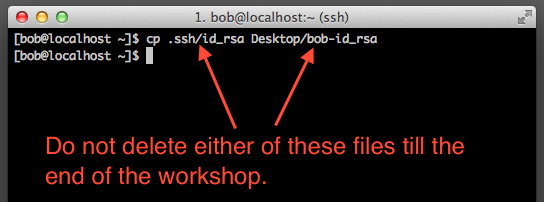
- If you do have keys, copy the id_rsa.pub key to your desktop as username-id_rsa.pub where username is your PennKey username
- Email this file as an attachment to pmacshpc@med.upenn.edu (please don't paste the contents of the file in the email). Ensure that emails have your full name, PennKey and the subject line "Public keys for GCB537"
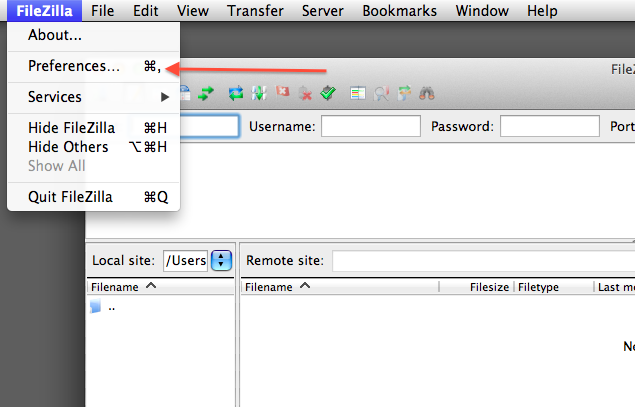
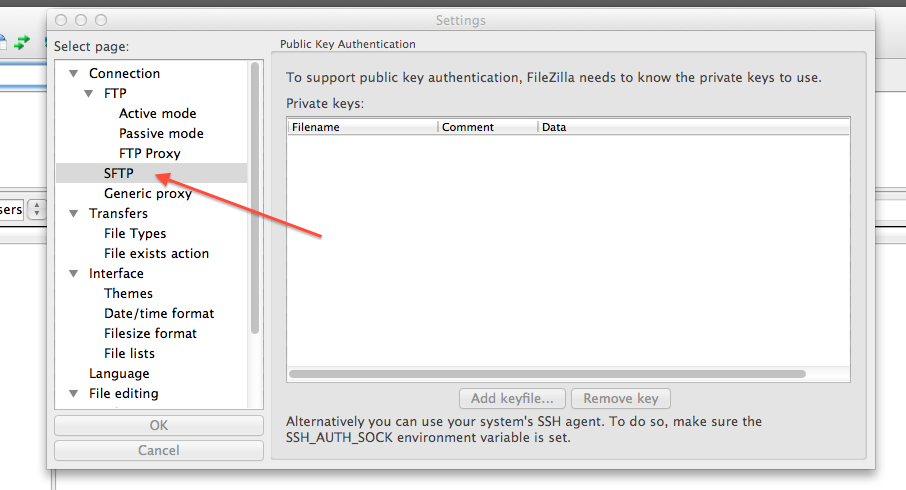
- Configure FileZilla/Cyberduck to use the newly generated keys
- Do not delete either the Public or Private key till after the semester
SSH key generation and testing connection to the class compute environment
Note 1: While following the instructions below, replace the server name demohpc.pmacs.upenn.edu with gcb537.pmacs.upenn.edu
Note 2: Your username is not "bob"! '
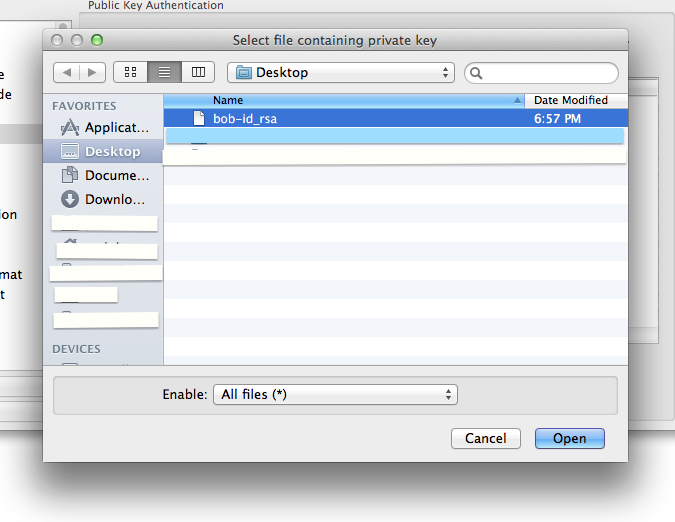
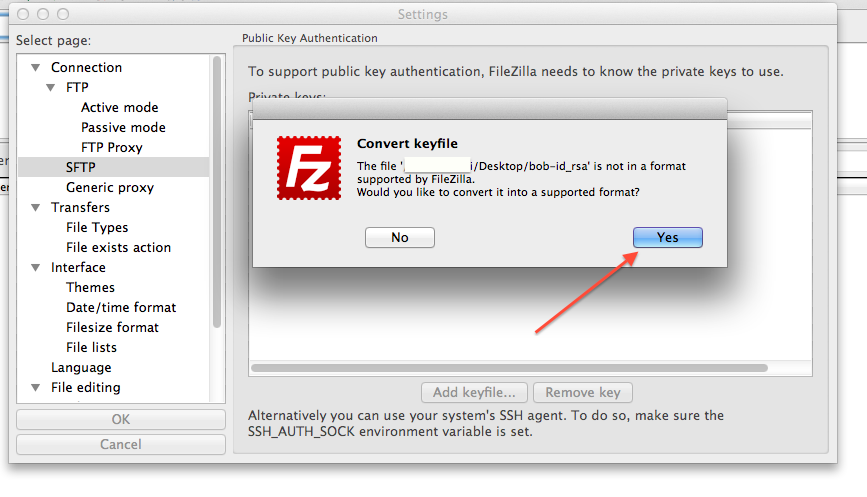
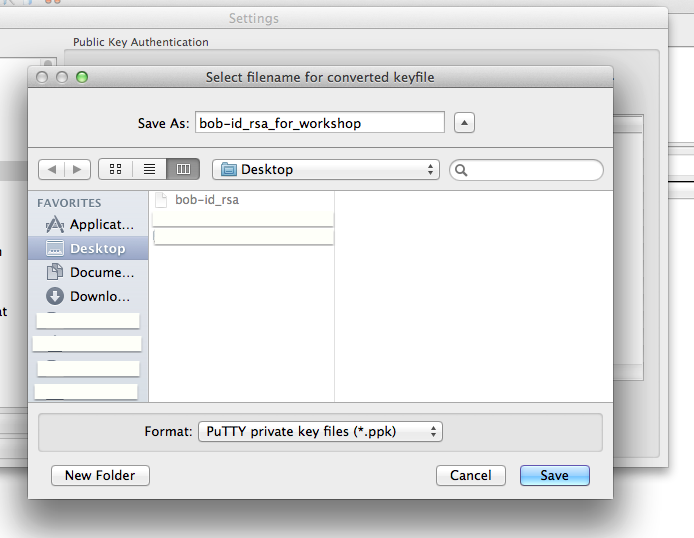
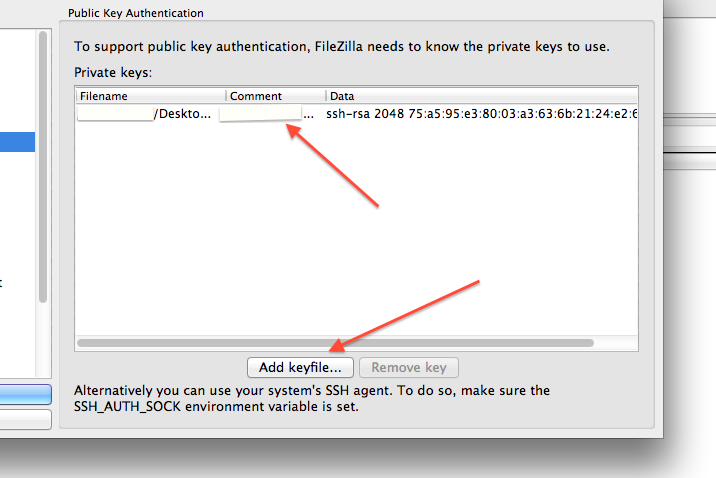
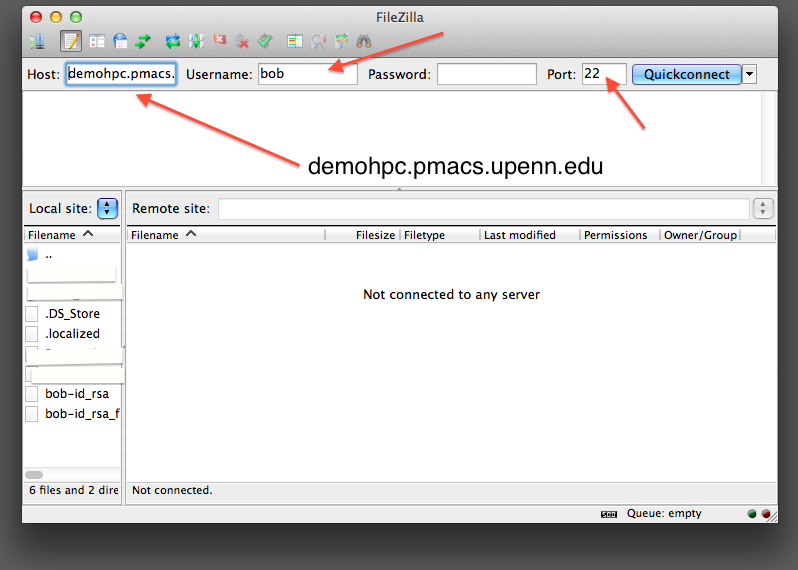
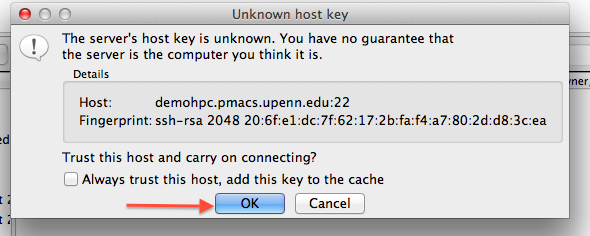
FileZilla setup for copying files to/from class cluster environment
Note 1: While following the instructions below, replace the server name demohpc.pmacs.upenn.edu with gcb537.pmacs.upenn.edu
Note 2: Your username is not "bob"! '
Setup information for Windows Users
Summary of steps
- Verify that you haven't already generated a Public-Priviate keypair (if you haven't used keys before, its safe to assume you don't have a key pair already)
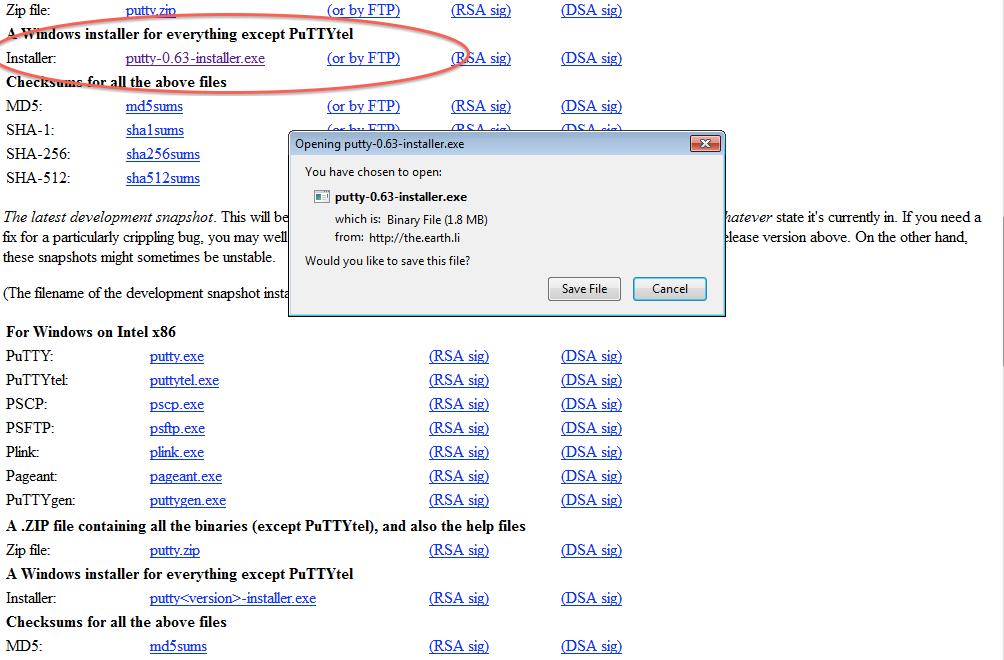
- If you haven't installed PuTTY (the full installer), you can download and install it from here
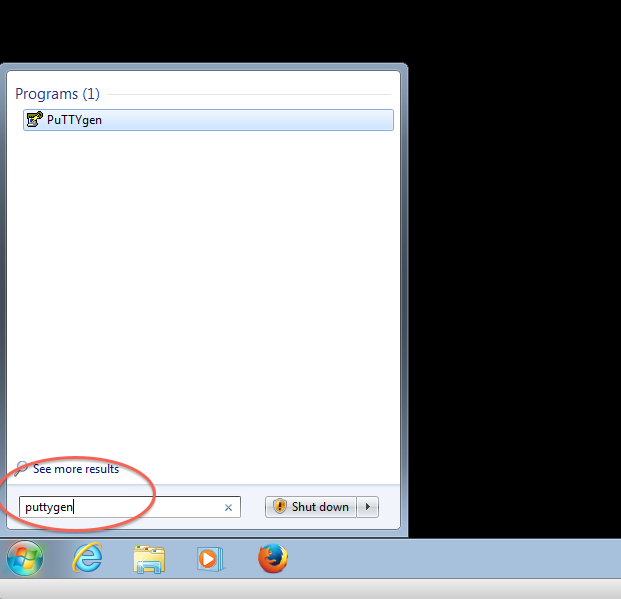
- Once installed, PuttyGen should be used to generate and save a PuTTy compatible Public-Private keypair
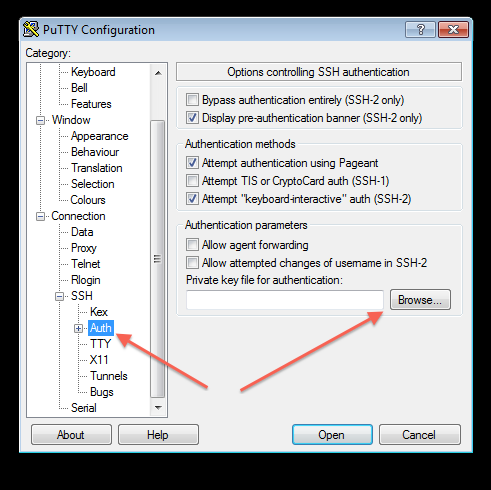
- PuTTY will be configured to use the generated keypair
- Install WinSCP for file transfer. WinSCP can be downloaded from here
- Import the PuTTY compatible keys and profile into WinSCP
- Test the connection
- Email only the Public key as an attachment to pmacshpc@med.upenn.edu (please don't paste the contents of the file in the email). Ensure that emails have your full name, PennKey and the subject line "Public keys for GCB537"
- Do not delete either the Public or the Private key till after the semester.
Step 1: Download and install the PuTTY full installer (if you don't already have it installed)
Step 2: Generate Keypair and save a copy of both the Public and Private keys
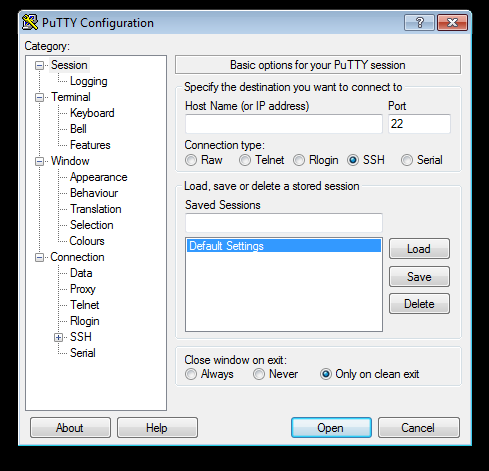
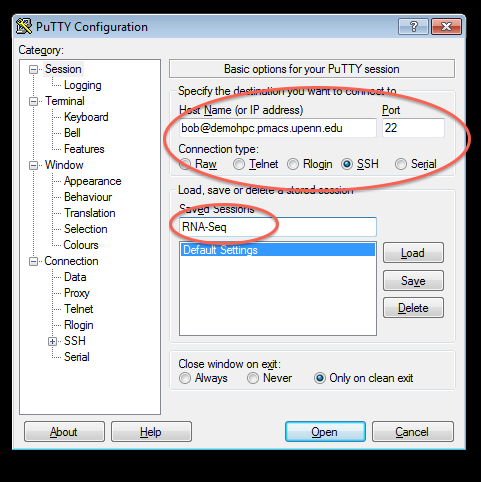
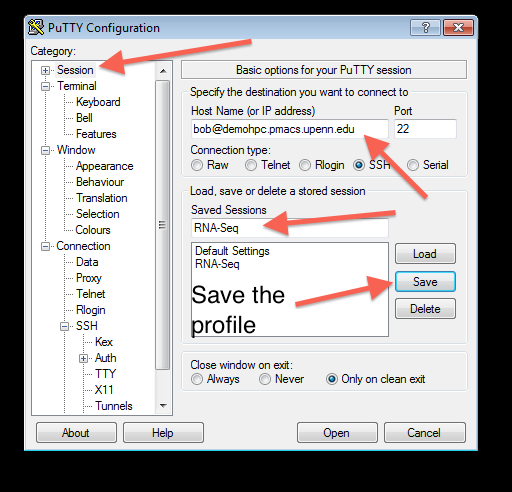
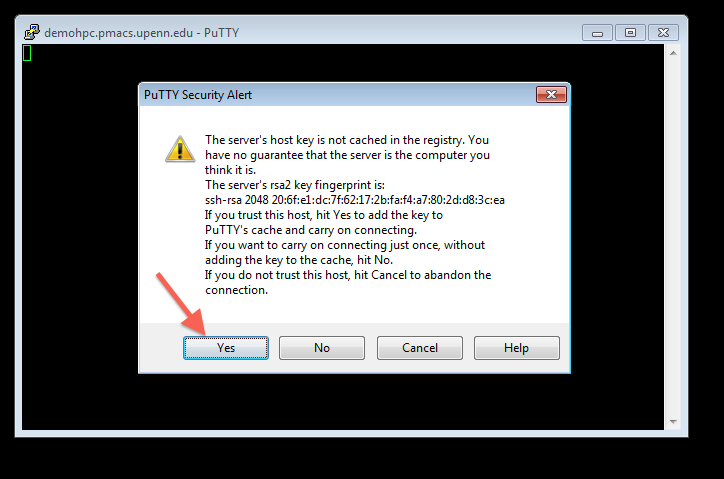
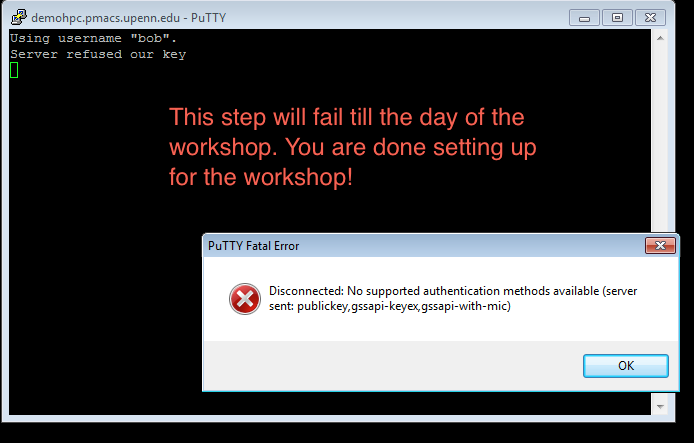
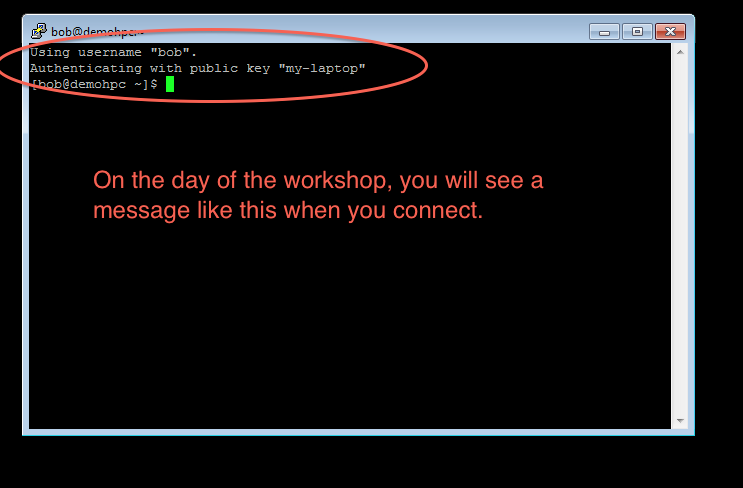
Step 3: Configure PuTTY to use the keys that were generated above
Note 1: While following the instructions below, replace the server name demohpc.pmacs.upenn.edu with gcb537.pmacs.upenn.edu
Note 2: Your username is not "bob"! '
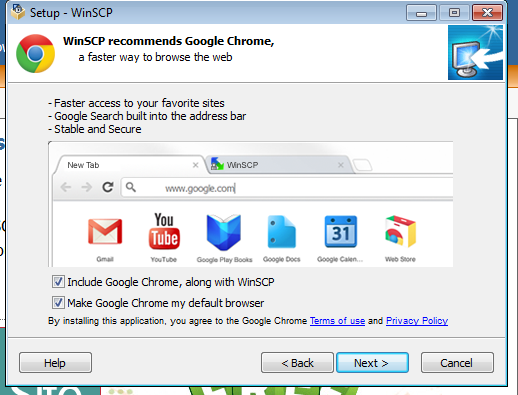
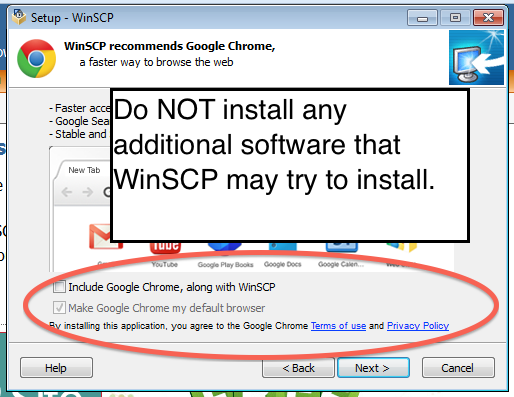
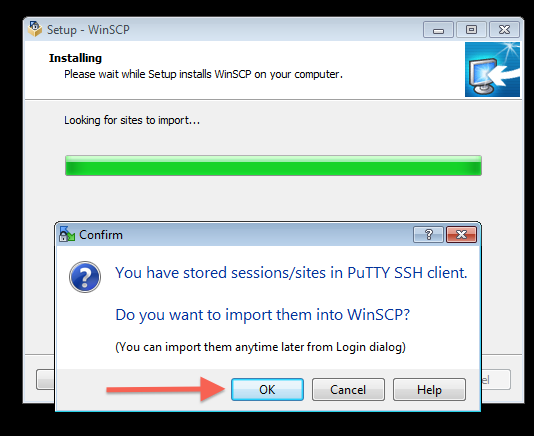
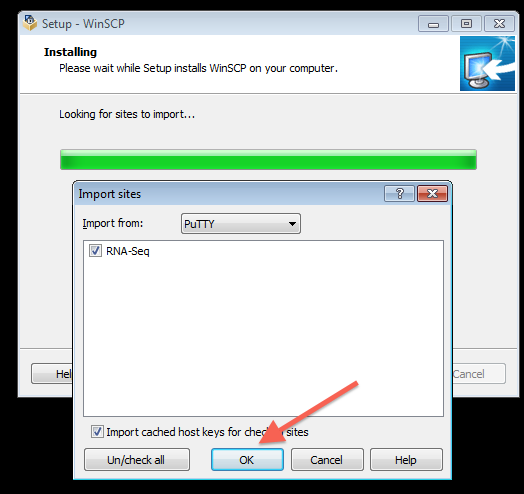
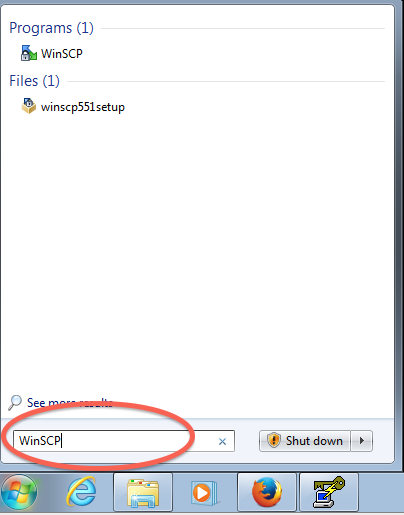
Step 4: Install and configure WinSCP to use the PuTTY profile created above
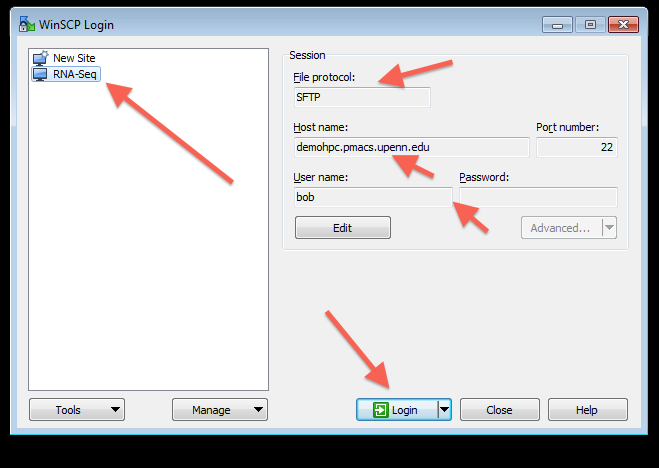
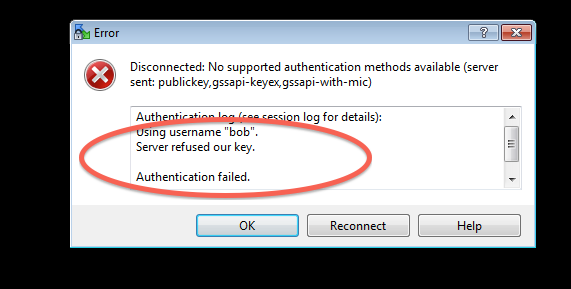
Note 1: While following the instructions below, replace the server name demohpc.pmacs.upenn.edu with gcb537.pmacs.upenn.edu
Note 2: Your username is not "bob"! '
More VPN INFO
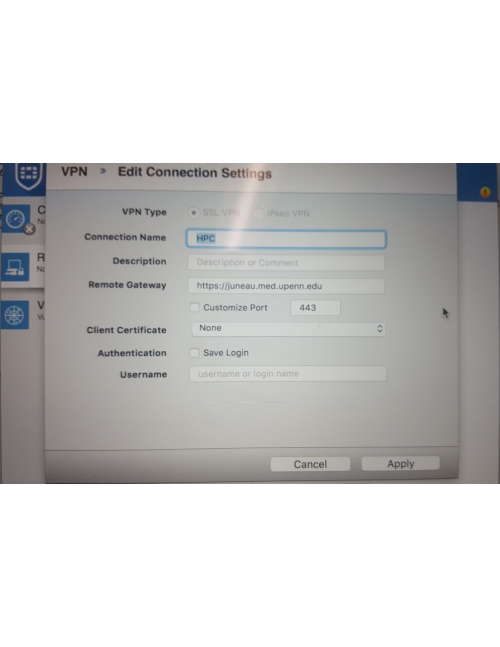
Below are screenshots that describe how to use the PMACS VPN on Windows or MacOS systems:
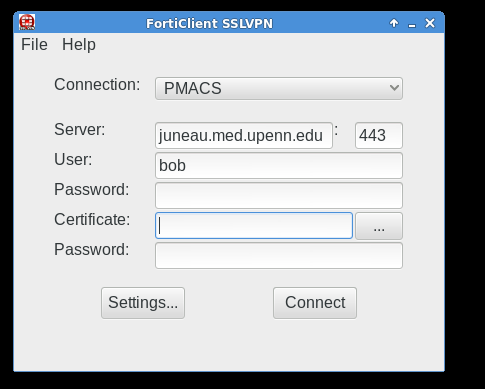
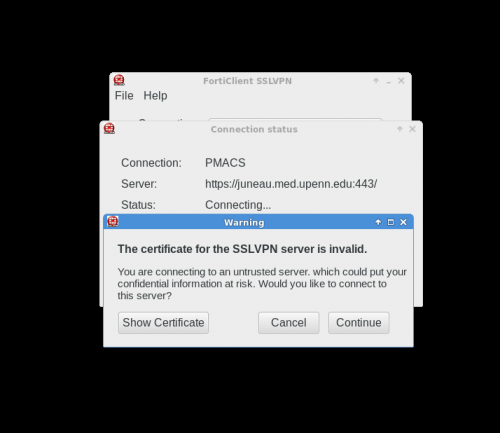
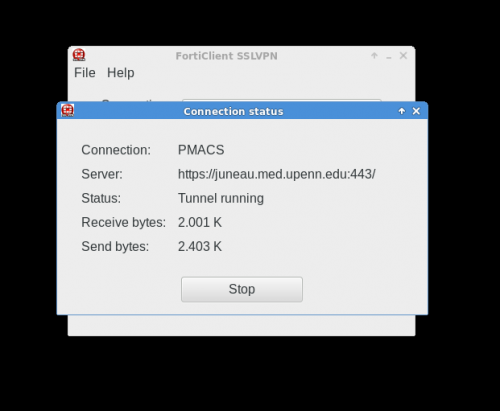
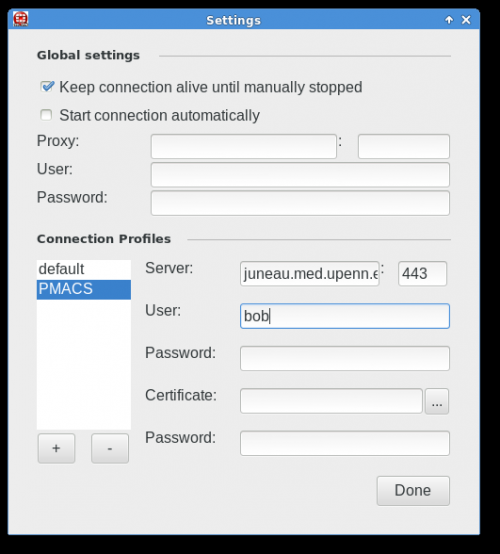
Below are screenshots that describe how to use the PMACS VPN on GNU/Linux systems:

